Showing posts with label girls bedroom decorating ideas. Show all posts

Sunday, September 27, 2009

Soft Pink Sophistication!

The roman shades and detailed carpet design give this girls bedroom a sophisticated touch. While the stuffed animals carefully placed around the room add charm, there's nothing little girlish about this bedroom - it's warm and relaxing.

This beautiful room was designed for the Traditional Home Showhouse in Woodstock, Georgia. Images from here.

Check back tomorrow for Halloween Idea Week!

Friday, June 5, 2009

Sophisticated Girls Bedroom

Such a classic, yet functional girls bedroom that softly says “sophisticated”. Sarah Richardson's designs are exceptional; she excels with her choices of bold striped, floral print fabrics.

Stacked colorful ottomans add to the bedroom decor and also make excellent storage.

Upcoming Posts:

Later Today - Chandelier made out of water bottles??
Tomorrow - Garden Tween Party - beautiful!

Monday, May 25, 2009

Inspiring Chair Transformation!

Not only did Fabulous Fifi take this chair from drab to fab, but she also styled the chair darling! Here is how it all started:

Fabulous Fifi spray painted the entire chair white (the cushion is vinyl fabric), then painted it blue and trimmed it in green. Both pre-teen and teen girls would love a chair like this - heck I'd love a chair like this!

Tuesday, May 19, 2009

Girls Bedroom - Raspberry Color

Raspberry is a bold color with special girl appeal and it's such a mood-brightening color:) Notice the warm raspberry color on the ceiling.
Photos from here.

White headboards, bedding and art help soften the bold raspberry colored walls. Photo from here.

The striped accent rug features the raspberry and teal colors in the bedroom and helps bring the room colors together. Photo from here.

Tuesday, March 24, 2009

DIY - Pink Play Kitchen

Reuse and recycle. Recycled junk can actually be made into some very usable items not to mention unbelievably awesome items. Could this darling pink kitchen be any cuter? Jane from outofthecrayonbox is the mastermind behind this kitchen - check out her tutorial for more photos and instructions. This is the AFTER photo. Check out the before photos below.
BEFORE:

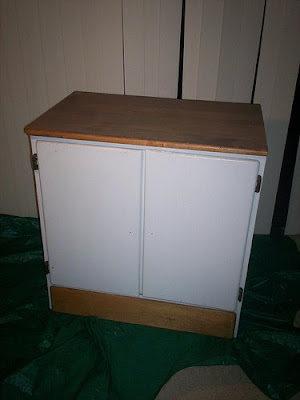
Jane: This is the cabinet that I found on the curb in the ally behind our building about three years ago. I brought it home and it sat on our balcony waiting for a purpose. Whenever my husband asked, I said, "Someday I will make something out of it."

I really wanted to use as much of what I had and spend as little as possible on this. It is a challenge to use what you have and make the best of it. I knew the doors would be re purposed. One door would become the divider for the kitchen set creating a sink and shelf area and a separate oven area. The other door would be cut to make two new doors.

Jane: For the sink I bought a small bowl with a lip at Big Lots. The lip is very important because it will support the bowl in the hole.I measured the bowl under the lip and drew a circle to that size on the cabinet top. I do not have a jig saw so I drilled holes all around the circle with my power drill and the largest drill bit. This took a long time. Then I used a smaller bit to drill holes in between the other holes. Finally, I hacked at the spaces between the holes with my screw driver and a hammer. As a result it looks like a beaver chewed the hole. You can kind of see this in this picture although, primer hides a multitude of sins. I had to sand the rough circle a lot to prevent splinters. The rough cut does make for a nice snug fit though. I think this proves that with a little ingenuity, one doesn't need a bunch of fancy tools.
I looked at all sorts of things at Lowes and Home Depot to become a faucet. Ultimately, a decorative letter "J" (from Michaels Craft Store $2) turned upside down and screwed in place seemed the easiest. I pre-drilled a hole in the "J" but it still cracked big time when I screwed it in place. To fix this I quickly poured wood glue in the cracks and held it together with a large binder clip over night. I am happy to report it is super solid. Once painted with primer the cracks are invisible. Primer makes such a difference. I used Kilz 2 Latex primer and was really happy to discover that it is low odor.It's very easy to use and it covers very well.

Jane: After painting the whole kitchen with primer and pink paint I added the burners. To make the burners I traced a roll of scotch tape and painted it with grey craft paint. Then I went over the circles with the silver craft paint. I cut 2" pieces of dowel and sanded one side flat. Then I painted each piece with black craft paint and glued them to the gray circles.
Thank you Jane for the inspiration to create something so unique and fun. And to top it all off - little money was used for this project.

Wednesday, March 11, 2009

Wednesdays - What Color is That??

vintage decorating girls bedroomStyle-savvy and absolutely charming are just a couple of words I would use to describe Marisa's bedroom. Raissa Mosher designed and decorated this sweet room for her (lucky) daughter Marisa. Benjamin Moore Deco Rose #1328 is the raspberry wall color with Sherwin Williams Pure White #7005 as the brilliant white wall color. The mahogany furniture was purchased as a set off of craigslist and painted the perfect blue paint color which is Sherwin Williams Cay #6772. Purchased at a yard sale was the gold vanity chair (love those kind of purchases). Raissa sprayed it white, recovered the seat and finished it with the same ruffle trim as the sconce shades. I love the random pieces of furniture that pull this room together!
Raissa: "My husband/all around handy guy added crown molding and beautiful window trim. I made the dark blue rouched pillow as well as glued the flowers onto the white pillow. The artwork was a major inspiration for the room and was chosen by my daughter at etsy.com. The eyelet coverlet belonged to her grandmother as well as the milkglass which we carried over from her previous room. The mix of vintage and modern is what I love the most!"
Next week I'll feature before and after photos of the furniture Raisa painted. It's very impressive to see ugly furniture with great lines revitalized to absolute beauty:) To view more photos of this room.

paint colors girls room

Wednesday, February 4, 2009

Wednesdays - What Color is That??

butterfly girls room
girls purple bedroomStacey Tannehill painted this adorable bedroom for her daughter Lauren. Stacey describes the process, "After looking at a room we liked with similar designs on the wall (the flyer was from home depot), we then hand drew all the designs onto transparency sheets (clear plastic sheets of paper). Then we used an overhead projector to transfer them to the walls. I also traced one of the butterflies off of her bedroom set and transferred it to the wall as well.
To get started we painted the walls with "Bed of Roses" by Behr. Then after tracing the designs onto the walls we painted the tallest light pink (looks almost white) ferns with "Rose Fantasy" by Behr. The really dark purple designs (some people think it looks brown in the pics) were painted with "Delicious Berry" by Behr. The butterflies were done with the same colors as well.
We then added trim base board which we stained to match her furniture and added her name which was painted with the same colors above, above the toddler bed.
We picked the colors to coordinate with her bedding and room accessories. Obviously this could be done in any variety of colors and still look great!"
To view more photos of this adorable room.

Thursday, January 29, 2009

Girls Garden Room


Great attention to detail and a lot of love went into this beautiful garden bedroom. The garden scene on the wall is such a perfect compliment to this entire bedroom. The fabric on the dressing table coordinates with the bedding which is so lush and inviting. This is one lucky little girl. Remember it's all in the details! Designed by Betty J Weir Interiors.