Tuesday, March 31, 2009

It's An Adorable, Edible Easter Bunny! D-I-Y


Many years ago, I owned a candy store in a mall. It was a bulk type candy store 200+ bins of candy. It was pure fun. We sold balloons, beanie babies, hand made fudge, sugar-free chocolates and darling gifts. My kids were young at the time - but they still talk about the candy store. I can honestly say our dentist loved our family:) We used to make these white chocolate bunnies at the candy store and sell them at Easter.
Technically, I need to explain that I've used the term white chocolate but they're really white candy melts. White chocolate needs to have 20% cocoa butter to be real... I've included instructions on how to make these adorable bunnies.
Step 1:
Melt candy melts (Wiltons or similar brand) in the microwave. Melt at 50% power. When chocolate melts, it is ideally a smooth mixture. However, if it comes in contact with a small amount of water, it will "seize" or turn into a grainy, clumpy mess. If you melt the candy too long (overheated), it will be thick and lumpy.

Step 2: Spoon melted candy into mold. Be careful not to overfill the mold.

Step 3: Let mold sit until candy is solid and easily removable. You can place it in the fridge to hurry it along. Pop candy out of mold. If candy doesn't pop out easily, that means it's not ready. This mold is a bunny candy box - made by Concepts in Candy (Northridge, CA).
Steps 4 & 5: Fill box with candy such as Jelly Belly Beans. Use pearl dust (luster dust) and brush on the entire bunny face with a make-up brush. Pearl dust is an edible sparkle powder. Purchase a make-up brush at the dollar store - obviously you don't use this for your make-up:) Pearl dust can be purchased at Michaels in the confectionery section. I used a q-tip to place the pink pearl dust on the ears, cheek and nose. Handle the candy as little as possible. Glue (use melted candy) the candy flowers (jumbo daisy sprinkles) on between the ears.

Last step: Place paper shred in bag and bag the bunnies. Tie a fun ribbon on and voila! Adorable. Cuteness. Don't leave these in a warm car - they get soft quickly. Also, if you need to make a lot of them just make the bunny face (lid only). You'll save time and money and still give a cute gift. Great gifts for teachers, neighbors and my girls church leaders. Somehow, I don't think my teenage sons church leaders would be too interested.... Check out all of our fun ideas on design dazzle!
Monday, March 30, 2009

How to Build a Cardboard Castle and Other Things!

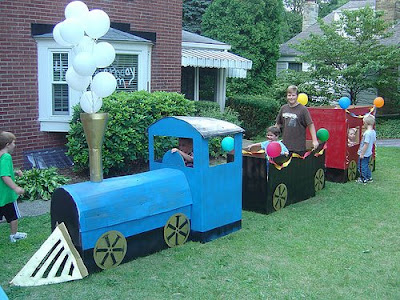
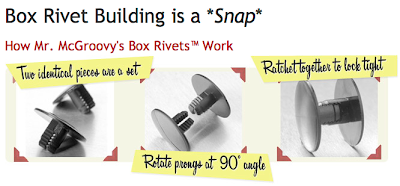
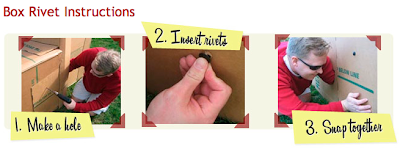
Cardboard is a great building material. As a kid I remember building forts, castles, etc with large cardboard boxes and duct tape. Mr McGroovy has designed a rivet an ingenious aid that helps attach cardboard pieces together into cool play structures i.e. castles, boats, trains, etc. These cardboard structures are attached together with these rivets and can take a good amount of abuse. Mr McGroovy was sure thinking with this simple yet great invention.
Visit his site for ideas, photos and free plans on how-to build a lemonade stand, space ship, princess carriage, and more! The rivets are reasonably priced and are reusable. Cardboard boxes are typically free. The possibilities are endless......


Friday, March 27, 2009

This Room Has Style

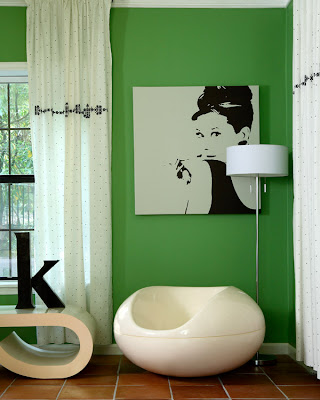
Love the crisp white against the apple green walls. There are a variety of ways to bring in vibrant color to a room - paint being one of them. The green walls sure give this room some punch - perfect for a teen girl. The headboard, crown molding, mirrors, drapes, etc help to soften the "punch" of the green. The espresso and black colored furniture and accessories help pull this room together. Room by Design Theory Interiors.

Thursday, March 26, 2009

Magazine Bowls

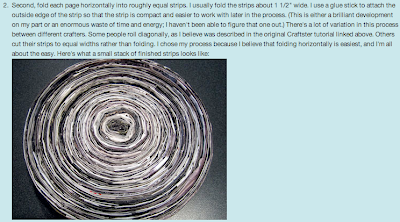
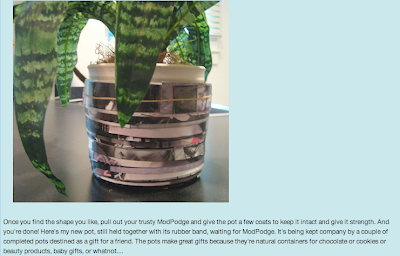
Magazines got the best of you? Do you have at least 20 magazines stacked in a pile waiting to be read? I keep saying someday... I'll read all of them. Well someday is here and they're still sitting in a pile. Check out this great tutorial on what to do with all the magazines that have been accumulating. IndiePublic posted this amazing tutorial by Tara Prigge. According to Tara "to make the bowls it's a time-consuming process, but quite easy and relaxing to work on while watching TV". Click on images to enlarge. Here are the four steps:


Wednesday, March 25, 2009

Wednesdays - What Color is That??

paint ideas for kids roomsIt's a block party! Add color and excitement to your plain walls by creating squares in complementary colors. You do not need to be a Picasso to paint these walls. The Neapolitan colors: Bistro White 7006-4, Chantarelle MS096, Macaroni MS089, and Silk Kimono MS011 from the Martha Stewart Colors. Photos and instructions from Lowes.
To paint the squares - you'll need painter's tape, a measuring stick, and four coordinating paint colors for this project. First, measure the height and width of your walls. Subtract 5 inches from the height (to allow for the five 1-inch rows of painter's tape), and divide this number by four to determine the dimension for the squares. Then use painter's tape to create a grid pattern on the wall. Apply a coat of paint to each square, and allow to dry. Tip: Before painting the squares, draw your grid on paper, and write in the colors that you plan to use in each block.

Tuesday, March 24, 2009

DIY - Pink Play Kitchen

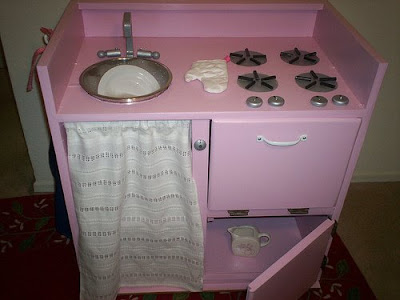
Reuse and recycle. Recycled junk can actually be made into some very usable items not to mention unbelievably awesome items. Could this darling pink kitchen be any cuter? Jane from outofthecrayonbox is the mastermind behind this kitchen - check out her tutorial for more photos and instructions. This is the AFTER photo. Check out the before photos below.
BEFORE:

Jane: This is the cabinet that I found on the curb in the ally behind our building about three years ago. I brought it home and it sat on our balcony waiting for a purpose. Whenever my husband asked, I said, "Someday I will make something out of it."

I really wanted to use as much of what I had and spend as little as possible on this. It is a challenge to use what you have and make the best of it. I knew the doors would be re purposed. One door would become the divider for the kitchen set creating a sink and shelf area and a separate oven area. The other door would be cut to make two new doors.

Jane: For the sink I bought a small bowl with a lip at Big Lots. The lip is very important because it will support the bowl in the hole.I measured the bowl under the lip and drew a circle to that size on the cabinet top. I do not have a jig saw so I drilled holes all around the circle with my power drill and the largest drill bit. This took a long time. Then I used a smaller bit to drill holes in between the other holes. Finally, I hacked at the spaces between the holes with my screw driver and a hammer. As a result it looks like a beaver chewed the hole. You can kind of see this in this picture although, primer hides a multitude of sins. I had to sand the rough circle a lot to prevent splinters. The rough cut does make for a nice snug fit though. I think this proves that with a little ingenuity, one doesn't need a bunch of fancy tools.
I looked at all sorts of things at Lowes and Home Depot to become a faucet. Ultimately, a decorative letter "J" (from Michaels Craft Store $2) turned upside down and screwed in place seemed the easiest. I pre-drilled a hole in the "J" but it still cracked big time when I screwed it in place. To fix this I quickly poured wood glue in the cracks and held it together with a large binder clip over night. I am happy to report it is super solid. Once painted with primer the cracks are invisible. Primer makes such a difference. I used Kilz 2 Latex primer and was really happy to discover that it is low odor.It's very easy to use and it covers very well.

Jane: After painting the whole kitchen with primer and pink paint I added the burners. To make the burners I traced a roll of scotch tape and painted it with grey craft paint. Then I went over the circles with the silver craft paint. I cut 2" pieces of dowel and sanded one side flat. Then I painted each piece with black craft paint and glued them to the gray circles.
Thank you Jane for the inspiration to create something so unique and fun. And to top it all off - little money was used for this project.

Monday, March 23, 2009

Dose of Modern Inspiration

A lot of parents appreciate the streamlined look of a modern nursery. Establish a modern look by choosing contemporary bold colors. Pull your look together with modern pieces such as the Eames rocker and accessories from ikea.
Flor tile squares make up the patchwork carpet. Flor carpet squares is an ingenious blend of form and function. These carpet squares come in a "tile" format and lets you create a rug that reflects your own style and the size carpet you need.

Baby nursery designed by beetle9

Friday, March 20, 2009

Before and After - Ugly to Beautiful

Last weeks post I featured a charming vintage room designed by Raissa. I mentioned I would be posting before and after photos of the furniture she painted. Well - here are the photos with impressive results! It's amazing what you can do with ugly furniture to make it beautiful!
BEFORE:
AFTER:
BEFORE:
AFTER:


Raissa: The furniture was purchased as a set on craigslist for $75. It was mahogany beyond repair. I primed it, painted it white, rubbed on the Sherwin Williams Cay (paint color), let that dry, then sanded it, then dry brushed some more of the blue... the pulls were metal which I spray painted white and sanded. To read last weeks post and view more photos of this darling vintage room.

Thursday, March 19, 2009

Teen Basketball Court Bedroom

Designer: Montanna & Associates

Incorporate your teens hobbies into his bedroom. Does your son eat, sleep, think basketball? How about a basketball court for a bedroom! Shooting baskets from your bed? Who would've thought? I would guess that most of us don't have the the extra $$ or the high ceilings to create a BB court in our kids room. The following post includes inexpensive fun ideas to create a basketball bedroom that's more reasonably priced.

DIY - Checkmark Shelves and Baskebtall Lamp

For the basketball fanatic - a phone. Great deal at $28.
Create a basketball court for your child with a cool rug!
Great idea - make your own basketball lamp. Purchase a make a lamp kit, shade and base. Drill a hole in a basketball, assemble the make a lamp kit. Attach the base and lamp shade. Pretty simple.

Sleek, well-designed shelves offer perfect storage to display items such as balls that need a spot to sit in. The basketball court bedroom photo (from the Teen Basketball Court post) shows checkmark shelves. I've included DIY instructions to make these contemporary shelves. Thanks to How Stuff Works for the DIY info. Click on image to enlarge.

Wednesday, March 18, 2009

Wednesdays - What Color is That??

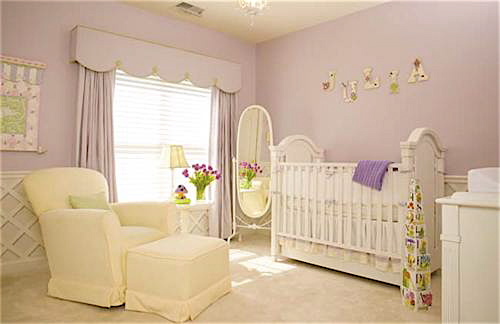
lavender baby nursery ideas
With its lavender colored walls and elegant look, this nursery is the type of sanctuary that many parents dream of for a sweet baby girl. Nursery designed by Kristin DeMarco of Gifted Notions. The paint color is Duchess Lilac by Ralph Lauren. The lattice wall treatment looks real - but is hand painted on the wall by the designers dad. To view more photos.

Tuesday, March 17, 2009

It's all in the NAME...

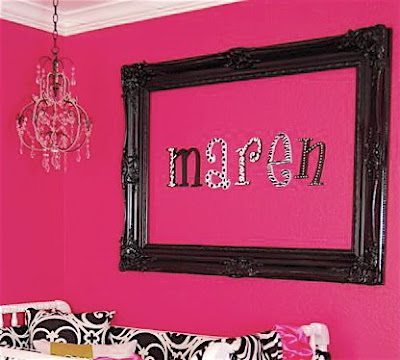
wall decorating ideas for kidsFinding the perfect art to make a big impact in your childs room can be difficult. Here's a solution - instead of trying to find art, create it yourself by spelling out a childs name. The top photo screams sophistication! Coordinating letters spell out Maren - a fancy frame was painted black to "frame" the name. Designed by Melissa Darst.
Everyday household objects bolts and gadgets were spray painted silver and attached to a pegboard to spell out the name Colby.... creative way to display a boys name. Perfect project for a dad who likes to tinker and has a lot of stuff laying around:) Created by klight.