Showing posts with label crafts. Show all posts

Wednesday, March 7, 2012

Rainbow Wreath


Hello! I am so excited that Toni asked me to come over today because I am a big HUGE fan of Design Dazzle. In fact, it was the first blog I ever followed and truly inspired me to be creative.


My name is Lina and I write a blog called Fancy Frugal Life. I am a mom of two kiddos who loves thrifting, holiday decor, birthday parties, kids rooms, and anything DIY or creative on a dime. I always say I have chic taste with a shabby budget!


Today I am sharing a fun, easy project I made in preparation for my daughter's upcoming birthday party. She has chosen rainbows as the theme. I decided to cut a foam wreath form in half to make a felt circle rainbow wreath.


For this project you will need about 1/8 yard felt of 5 colors of the rainbow plus white for the clouds, scissors, pins, and your foam wreath form cut in half.


All you do is cut your felt in what seems like a zillion circles. I used a small cup for my stencil. My circles were about 3 inches for the colors and the white circles about 5 inches. Fold the circles in half and then in half again and pin the pointy ends to the foam. Yes it's time consuming...I just watched 2 episodes of Parenthood on the DVR while making this :)


So now I will have this to hang up at the RAINBOW party!


Remember to.....


Thanks for having me Toni! If you liked this I hope you'll drop by Fancy Frugal Life and follow along. Have a beautiful day.


Wednesday, December 14, 2011

Christmas Gift: DIY Embroidery Kit Using The Cricut Machine!

Need a simple and inexpensive DIY Christmas gift?  Make an embroidery gift kit using the Cricut personal cutting machine. How do you do that, you ask? Well, it's simple - Cricut markers are perfect for making an embroidery transfer on fabric. I LOVE this idea! If you have a Cricut machine, get yourself some Cricut ink markers. These markers draw shapes instead of cutting out shapes. Just replace the blade holder with a marker and voila you can have beautiful drawn images. Imagine all the possibilities, paper, fabric and more?? This project was my daughters first try at embroidery (it was easy and fun)! This is a perfect activity for girl scouts, activity days and your own girls! Keep reading to see how to make this into a kit that you can give as an inexpensive gift.


Instructions


Replace the cutting blade in the Cricut with the marker as shown above. Make sure to adjust the speed and pressure. Place paper onto mat and experiment on paper at first. Load mat, hit cut and the marker draws the images you've chosen! Remove the marker and replace the cap right after your project,  you don't want it to dry out.


Linen fabric is easy to embroidery with. Place linen fabric directly on sticky mat (no need to use heat n bond). I use a fondant roller to help adhere the fabric to the sticky mat (apply pressure). The mat needs to be sticky for the fabric to adhere well. Load your mat into the machine. Choose the image you would like to use as an embroidery transfer. The image shown above is "Stick Pin" from the Opposites Attract cartridge. Hit cut and the image you chose is drawn on your fabric! Imagine all the fun with the thousands of images Cricut offers ; )


To make an embroidery GIFT KIT:


needle (the plastic needle shown is for little kids)

embroidery thread

embroidery hoop

fabric with drawn image (created on your Cricut machine)

paper bag

print instructions (if needed)- see below


Check out the instructions for embroidery stitching basics from Abby of Projects For Your Nest.


I also used the Cricut markers to make a design on a paper bag. Tape bag down using masking or painters tape onto sticky mat. Use the steps shared above to draw a design on the bag.


Cute, heh??


Here is the final product. I placed all the embroidery items in the bag, folded the top down and used a zigzag seam finish (on my sewing machine) to close the bag.  The supplies cost about $3 for one kit.

This is a wonderful idea for Christmas!


Catch Santa in your house


200


Saturday, November 19, 2011

Felt Christmas Trees

Hi, I'm Rachel from Lines Across My Face. I am so excited to be here guest posting at Design Dazzle. Thanks Toni for including me in your Christmas series!


I am the mother of these two cute little ones.


Lines Across has turned into mostly a craft blog. Almost all of my projects {like my scribble gift bows, football onesie, and felt flower tutorials} are simple enough that almost anyone could do them with things they already have around the house or a $5 trip to the craft store.


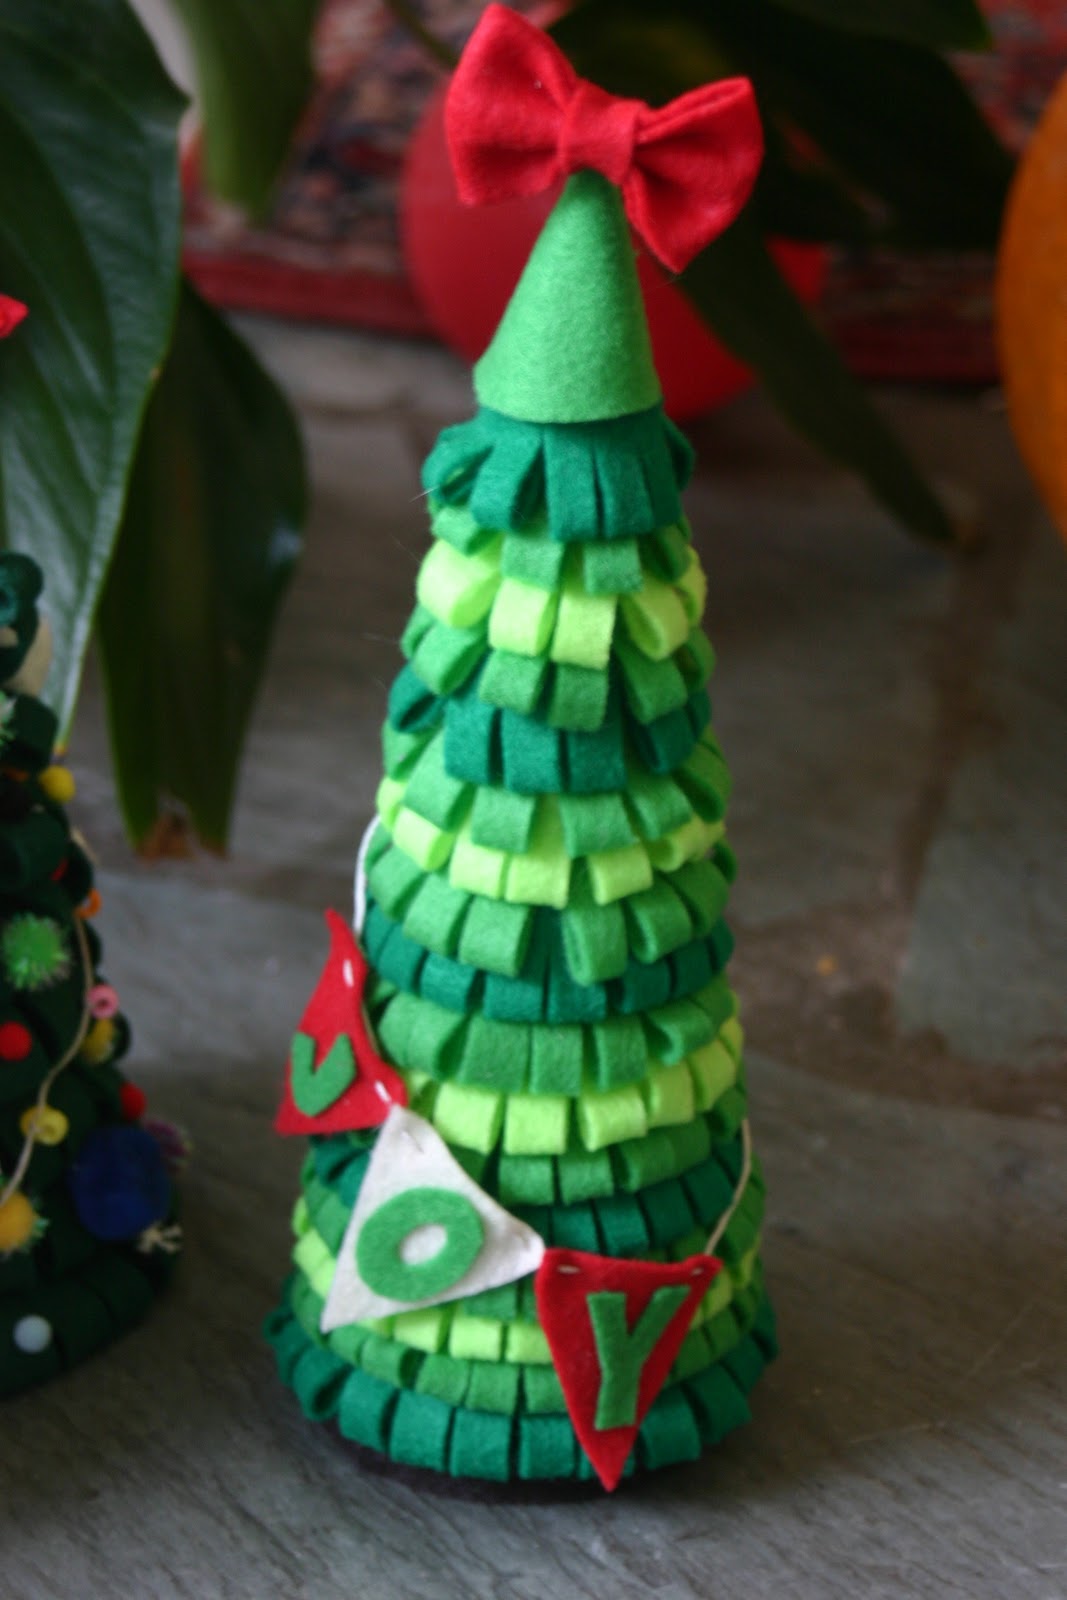
I wanted to make four felt Christmas trees, one for each member of our family. These trees are very easy to make and cost about 30 cents each. They are also so much fun because you can make many different versions and you can even let your kids help you decorate them.


These are generally based off of this pom pom felt flower that I love to make.


First you need to make cardboard cones. You could also buy cones from the craft store or the dollar store. I used cardboard from cereal boxes which I rolled into cones, glued with a hot glue gun, and secured (at first) with rubber bands. I found that they were very sturdy, especially once they were covered with felt. Keep in mind that some of the cereal box could show through.


Next, you need to make a lot of felt "leaves" (like the pom pom flowers). For my first tree, I cut strips of felt that were about 2.5 inches wide. Then I folded over the strips and glued the edges together with a hot glue gun. (If you use too much glue, the strips will harden and become difficult to work with). Next, I cut notches across the strips, about 1 cm wide, making sure to not cut through the glued edges. You can play around with different size strips and cuts, but I found that it looks best to be consistent with each tree.


Now, you start gluing the felt strips around the cardboard. I made a lot of different rings. When I got to the end of the circle, I cut the felt strip and then used it to start the next layer. I also added a small cardboard circle to the base of the tree for support.


I made 4 different trees for each of the members of my family. If your kids are a little older, they can have a lot of fun helping to decorate their own tree.


My tree


I made the cone a little bit thinner than the kids' trees. I cut the strips at 2 inches wide and the notches at about 1/3 inch wide. I added a felt bow to the top. I also cut out three felt triangles, glued on the letters J-O-Y, and quickly sewed them together into a mini bunting. I alternated the shades of green felt for each layer. I also added a plain brown strip of felt around the bottom to look like the stump.


Grant {my husband}'s tree


I made Grant a Dallas Cowboys tree. I topped it with a silver star and used alternating blue and silver rows of felt leaves. I cut out brown football shapes, stitched them together, and wrapped them around the tree.


Benjamin's tree

Benjamin's tree was the simplest. I just glued buttons (which he LOVES) to the different leaves around the tree.


Lyla's tree

Lyla's tree is the fun kid tree. I glued on pom poms, snowflakes, etc. I also tied little beads along a piece of embroidery floss and wrapped it around the tree like little lights.

(I also used bamboo skewers for grilling to hold up the stars. They are much cheaper than anything you would find at the craft store.)


Thanks again, Toni for having me! I would love for you all to stop by and check out Lines Across or follow me on Facebook.


275

Sunday, November 13, 2011

Christmas: Footprint Penguins

Happy Holidays, Design Dazzle readers!  I'm Laura, from Come Together Kids and I'm thrilled to be here sharing a way my kids and I came together to make an adorable (and meaningful) gift for the grandparents.


How cute is this group of penguins in their little hats and scarves?  Doesn't the shape of their bodies look familiar?  That's right, they're footprints!  I made this adorable canvas wall hanging for the grandparents last year using the footprints of all the grandchildren.


The project was pretty inexpensive and not too difficult to make at all, but even more importantly, the grandparents loved it! 


Here's what you'll need:


  • plain artist's canvas ( I had a lot of footprints, so I used a 12" x 24" one)

  • two pieces of blue cotton fabric for the background (mine had small prints that somewhat resembled the snow and sky)

  • black cotton fabric for the footprints (mine had a subtle dot pattern)

  • scraps of fleece or felt for the penguin accessories

  • Heat'n Bond Ultra Hold Iron-On Adhesive 

  • acrylic paint for the eyes


  • snowflake buttons (optional)

  • iron and hot glue gun


Here's what to do:


1.  Iron the Heat'n Bond to the wrong side of the blue fabrics.  Overlap the two fabrics slightly to form the "ground" and the "sky".  (I cut a slightly wavy line where the two colors met.)  Cut your fabric a few inches larger than the size of your canvas.  Peel off the paper backing and iron your pieces directly to the front of the canvas.  Wrap the excess fabric around the sides to the back and hot glue in place.


2.  Next, iron the Heat'n Bond to the wrong side of the black fabric. Then trace the child's footprint onto the paper-y side.  Cut out the footprints.  (For an example of how this is done, see a similar post I did with Footprint Butterflies).  Peel off the paper backing again, position your footprints where you want them on the canvas and iron them in place.


3.  Now you'll want to add your penguins' clothing!  I simply cut out pieces of leftover fleece to make little hats and scarves and hot glued them in place.  Then I cut ovals out of white fleece and hot glued them on to form the penguins bellies.


.


4.  Finally, use a bit of acrylic paint to paint on your penguins' eyes  (I initially planned on using googly eyes, but I liked the look of the painted eyes much better!) and add little triangle noses ( I just glue on a small triangle of orange paper)  I also added a few snowflake buttons in the "sky".
.


5.  That's it!  Whether you're making just one penguin or a whole waddle (yes, I looked up the term for a group of penguins!), this is a really cute way to use footprints to create some winter art.


I hope you enjoyed our little project.  I really believe it's simple and heartfelt gifts like this Footprint Penguin canvas that truly make Christmas Wonderful!